Showing posts with label you're gonna love it Tuesday. Show all posts

Saturday, February 07, 2015

A right old crafting fest: Making up my Blogger snail mail parcel for Janet

Hi, I thought I'd share a post about what I sent to Janet reciprocally for the recent Blogger snail mail swap. I was waiting to see if she'd post first anything first, but she doesn't seem to be so I will just go ahead and write this anyway.

One of the things I like about Blog swaps is really really trying to think about what to get for someone, particularly when it inspires you to craft.  I have always tried to make something for most swaps I do, though the pre-Christmas ones didn't really give me much time for this.

I do like to a proper thorough job on trying to find something for that person by reading the blog archives (that makes me sound scaaaary, but I'm trying to show the dilligence!) of the blogger in question. By that, I mean, really going through their archive to find what they really like. I did this with Janet, reading every wishlist she'd posted ever, looking at particular themes that arose.

In this case: books, words, lettering, maps, mustard, Peterpan collars, vintage fun, dresses were main themes that I noticed.

The first item I decided to make was a Scrabble Brooch.  I'd seen a brooch on one of her wishlists, seen she'd recently starting wearing a brooch and I had been intending to make Scrabble brooches for a while with my Nan's Scrabble set. Having purchases some tiny brooch-backs a while ago, I just needed to use some strong all-purpose glue as I have not plucked up the courage to try my glue-gun yet (I am scared of them!). It wasn't particularly neatly done but from the front it was fine.
Scrabble brooch
 I had a small white box from a pair of earrings I'd bought so I decided to customise it. I know Janet likes book text crafted into other things, so I found these love heart confetti pieces I had picked up from my table at a friend's wedding last year (yes, I know that's a bit cheeky but like they were going to go round and rescue every bit of confetti after their wedding, they'd have just ended up in the bin) and stuck them to the lid with an edging sticker from my craft stash.
Brooch box

Pre-making this card, I'd picked up a 25p book in a charity-shop to use for craft purpose, making sure it wasn't something I'd love but you know what, I could not bring myself to rip out pages of the actual story, it just seemed sacrilege so luckily, it had a preview of the next book in the series at the back and so I ripped those out to use, thus meaning I didn't feel guilty.

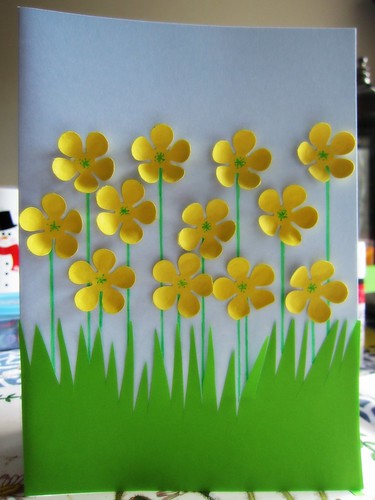
Janet declared her love of peter-pan collars, so decided to use a circle punch, dress-shaped punch and edging punch to make this card. I'd love a dress like this.  I wrote a rather long and rambly message inside explaining why I'd chosen the gifts. Was rather pleased with it.
Book dress card

Having seen Janet's liked to make craft items out of old music, I decided to use some music which had been destined for the dump at Music camp (the book I used for my Ivy Heart  collage in the summer) and an envelope template to make her 5 envelopes out of them, added some gold ink to the edges and tied them up.
music envelopes
Since Janet showed that she liked map-items in various wishlists, I used an old 2002 atlas I'd saved when we were clearing out Grandad's house to make some larger sized map envelopes.
Map envelopes

The next item was a bit of an afterthought.  I spied a small decoupaged music heart (you can see it below in the 7th picture) I'd made in the summer and decided to try and make a coaster using decoupage technique for Janet, double-sided with book paper and maps. You can see the process below, which included trying to varnish it with PVA glue.

Making the heart coaster

It looked ok though I wish I'd have avoided the yellow borders!
map coaster
The other side, still from the preview chapter.  I did varnish it with PVA. Not sure how durable or waterproof it is though, but we'll see...
Heart coaster

The final hand-crafted item I made was a bookmark. I used the remainder of the turquoise card from the card and cut out yellow letters and shapes with some punches.  Janet had featured a Hello Sunshine postcard on her mantelpiece and a bag in her wishlist so I figured she might like it for a bookmark since she is an ardent book reader.  Luckily, I had some laminating of Music Vocabulary to do at school and the word cards are slightly smaller than A4 so I squeezed the bookmark in with them.
Bookmark


So that's almost the end of crafted items which I was quite pleased about though nervous of Janet's reaction because she is a neat crafter and I a scruffy one.

What about the other items?


Peterpan collar
I know Janet likes Crocheted Peter pan collars and I had picked up one or two when I visited Bruges, a place famed for its lace, (indeed, I sent one to my Blogger friend Lauren of Someonelikeyou) and had had it in my storebox for a long time, intending to give it to someone who'd loved such collars and would appreciate it so I was delighted to think of it for Janet.
mustard bangle
Janet declared a love of mustard clothes recently and when I saw this bangle, it reminded me of the cable knit jumper she'd worn in a blog post.
IMG_9775
Finally, Janet loves books. I stalked many blog book reviews in order to see if she'd come across Carola Dunn (whose books I love), and took a chance that she enjoyed Agatha Christie so might like this gentle Whodunnit!

IMG_9737
The last task remained to wrap up the items. I decided to design some wrapping paper especially for Janet. I opened an A3 sized Publisher document found the opening quote from our mutual favourite book, I capture the castle and collaged this all over the page.  I then cropped an image of Janet's own logo and superimposed it over the top at equal intervals and then, after printing, had some unique wrapping paper.

IMG_9783
You can see the items wrapped up in their box (recycled Glitterati box so had a nice sparkly bow on it) ready to go. I accidently left out a roll of vintage ribbon I'd intended to send also,but never mind!

It was great fun trying to think of things that Janet would like, she really did make me get my act together and do some crafting, which I haven't done much of for ages,so I love it when a swap partner is the type of person to spark my creativity!  Thank you Janet, and I'm so glad you liked your presents!


Linking up to:

A round tuit with Creating my way to success


Creative Mondays with Claire Justine

 Brilliant Blog posts with Honest Mum

Brilliant blog posts on HonestMum.com
 You're gonna love it Tuesday with Kathe with an e


Monday, November 24, 2014

Craft and surreptitious maths investigation!

Maths card
It was Sunday at 1pm and we had to be at my sister's for 2pm for my niece's 5th birthday party, half an hour drive away.  Problem was, I hadn't made her a card and UNDER NO CIRCUMSTANCES would a bought-card be tolerated in that household, my sister would be really disapproving/disappointed in me as would I. In myself, I mean.

Thus, I decided to do create a quick fun card I had been thinking about as an idea for a card that children could make for their friends' or relatives birthdays.  It would be a sneaky fun way that parents could get their children to do some maths investigation,  whilst having craft/making fun.  It was based on something that my Father-in-law and Brother-in-law write in cards to each other.

The idea is, you take the age of the recipient and try to make that number in as many ways as possible.  This of course will vary, based on age.

To support your child doing this of course, particularly if they are younger, you can provide cubes or marbles/multiple objects. 5 for very young children (just addition) or 10 or just a whole bag, so they can count out the objects to make the sums.

Image from TTS group

You can choose to use one operation, e.g. adding or all four: multiplication, division, addition and subtraction.  Fractions or decimals could be involved for Year 4-6 children (8-11 year olds)

You will need to make it fun then by providing either a set of wonderful coloured pens (CBC has these delicious Staedtler fineliners that I used) OR you could use number outline stickers OR  stamps OR funky-foam numbers

Staedtler 10 Piece Triplus Fineliner Pen Set
Staedler fineliners from Hobbycraft*
Hobbycraft Clear Stamp Bold Alphabet & Numbers 36 Pack
Clear Stamps from Hobbycraft*

Outline Stickers Small Numbers Silver
Anitas outline stickers From Hobbycraft*

Hobbycraft Glitter Alphabet Stickers Tub
Yep, also from Hobbycraft*- pretend they are numbers...

Once you have sourced your 'fun element' then get said child to try and find ways to make the number. (might want to try on scrap paper first)  As you can see, I tried to make mine in a way that my 5 year old would understand.  Don't forget encouraging/leading/extending words such as 'How about trying to combine more than 2 numbers?' or 'What about subtraction?'
Maths card

For even younger/lower-developmental stage children, you could just get them to draw/stamp five objects together, e.g. 5 hearts, 5 stars, 5 footprints.

To finish mine off, so it didn't look SO much like a 5 year old did it, I added gold outline stickers round the edge to give it a border and some dots.  And just so you know, I drew a HUGE multicoloured 5 inside but it was messy so you don't get to see that.

And there you have it, a card that can be made for anyone of any age, that gets your child investigating numbers along the way.  Also would make a possible man-card.  WOMOTM, My father-in-law , you know what you're getting next year....


My Father-in-law would expect something like this though... Eeek, genius child eh?!


Image borrowed from bodysmartinc.com*


Hope you like this idea.  Let me know if you try it out.

Best wishes,

Kezzie


xx


*Disclaimer:  the large number of references and links to Hobbycraft does not mean I was bribed/sponsored/endorsed/paid by Hobbycraft to write this post, I merely wanted to find a way for them not to sue me for stealing all their images by making you all go shopping there as method of appeasement! Rather like offering a goat to the gods/totem pole.

*  Disclaimer no. 2: Regretably, Bodyincsmart.com didn't sponsor me either, but go and look at all their pretty sums- maybe you can buy one to save me once again....

****


Linking to:

Monday Parenting Pin with Romanian Mum blog, hosted by

Romanian Mum

Tuesday's In and out link party with Cynthia Ladrie  at FeedingBig
In and out of the kitchen link party

You're gonna love it Tuesday with Kathe with an e


Creative Mondays with Claire Justine


Brilliant blog posts with Honestmum.com
Brilliant blog posts on HonestMum.com

The Pink Elephant Challenges "Anything goes"

and...


Saturday, November 22, 2014

SNAP!

Snap!

I've alluded to WOMOTM's 60+20th* birthday celebrations a few times and so I thought I'd share his birthday card on here. I've suffered card-making ennui over the last couple of months, mainly due to the fact, it's a right old faff finding the two keys, putting shoes on and heading out to the shed, shielding myself from the rain, braving spiders of gargantuan proportions in order to seek craft supplies and groping around in the dark (light doesn't work). That doesn't even go into the fact I can't find a thing due to it all being in a random mess!

Nonetheless, WOMOTM was worth the effort and so I bravely survived the spider/dark/wet-long frass ordeal and sought supplies in order to make him a card. I knew I wanted to make a 3D-looking camera, as WOMOTM is very fond of photography.  I glanced at a camera picture on the internet and cobbled this up out of black card.  The lens was built up about of 4 black circles of card, layered on top of each other with 3d sticky tape and then the silver and black ones placed on top.  I embossed the lines at the top and bottom and went over them (stupidly first with pencil- hence the smudging) and then with silver pen to add more dimensions.  Finally, I tried to draw on the telescopic lens and added the Happy Birthday sticker and a drawn on strap,

It's not my favourite card I've ever made, but it seemed to pass muster as it has made it long term onto WOMOTM's mantlepiece according to a lovely e-mail from him (only select items stay there permanently)

* We were asked not to elude to the actual number- hence the maths...


Linking to Creative Mondays with Claire Justine

You've gotta love it with Kathe with an e

Tuesday, May 27, 2014

Top shaker


Bottle top snake
I have finally created a junk instrument (apart from the Smartie panpipes) that actually sounds relatively good!!!! I am a music teacher and I embrace and adore children exploring sounds they can make with anything but from a personal point of view, do not enjoy junk-instrument making on  grand-scale with lots of children simultaneously.  Whole-class junk instrument-making is usually awfully hard to teach.  It used to be a Year 5 Design and Technology project that was horrendous to teach and elicited not the best of results. The trouble is- most of the things they want to make might look cool but from a musical point of view don't make the best sound- which is surely the point of an instrument.  Ok, shakers are ok- they usually make a good -sound, BUT I've tended to find that the DT element of this seems to be, to be generally lacking- in the case of shakers- it's not really designing, it's kind of copying since I tended to find the children just wanted a quick result rather than thinking really well about the design and sound! That's fine if you just want to make a junk instrument but from a teacher having to teach DT and really covering the designing point of view- less good! The rubber-band guitars would just collapse, not be robust enough, sound too quiet to be of much use and the straw panpipes would be impossible to play unless you were a flautist like me.  There are probably good teachers who would teach this better than me and yield good results, but with 30 children having to design their own instruments, it's always just been a case of AHRGH! I think the process is a good one to try for children, I just find it hard to do with 30 children at a time!


Anyway, for anyone who'd just like to make a funky junk instrument with their kids, here's an idea:

For a while now, I've thought that plastic bottle tops, particularly those from milk-bottles had a really nice timbre when you clicked them together and have wanted to experiment with making an instrument with them.

Now, I was saving up bottle-tops to make a bottle top snake which I must have seen in the same craft-book as Ang as she posted a piccie of one and I bemoaned the fact I'd lost my stash and snake when moving and the sweetie that she is, she sent me a 'DIY Bottle-top snake kit' in the post for me to recreate it!!! I was so touched and laughed lots at the ingenious and sweet idea! However, I haven't got around to making mine yet.  But in the meantime, I nicked a few bottle-lids from the kit which I will replace, in order to try out my instrument idea in my mind.

I figured this one be a great instrument for a kid to copy and make if they wanted some sound-makers.  So, to make my BRAND NEW instrument- THE TOP SHAKER, you will need:


  • Bottle tops that are thin plastic (too thick and you won't be able to do this with my equipment)
  • A safety pin or other sharp-needled device.
  • An old biro that doesn't work anymore
  • Nice solid thread- I used cotton thread here as it doesn't unravel (it came from a charity shop)
  • A kitchen roll tube
  • Scissors
  • Coloured pens


Top shaker tutorial 2
1.  Gather about 9-10 bottle-top lids (you could choose mixed colours but I stuck to semi-skinned Green)
2.  Using a safety pin or old-biro, press the needle or biro into the middle of the top until it goes through and makes a hole (don't do on your nice tablecloth, just in case...). Do the same to all of them.
3. Now fetch a kitchen roll tube and make equidistant holes all around the circumference with a safety-pin (or needle). I supported the tube at the top with my fingers so I didn't rip it.
4.  Now get your biro and go through these holes to make them larger.
5.  Cut lengths of cotton-thread of about 15cm each, enough for each hole and bottle top.
6. Thread the cotton through the hole of the tube and then through the bottle top and tie them in a knot- double and triple up the knot.   Do the same with each one.
7.  Check you are happy with the length of the string by letting them all hang down and give a little shake. Make shorter if you wish. Trim the ends off when happy.
8. Hang downwards to check if tangled.
9. You could leave the tube blank or you could decorate like I did.  (Alternatively, it might be best to do this before you begin??? You could even cover it in wrapping paper though it'd be harder to make holes)
The top shaker finished instrument

10.  Finally, play your Top shaker to your heart's content.  Or get a band together.

Here's it in action. I like the sound- reminds me of these African seed shakers we have in school- or the sound of pebbles crashing together at the sea side!


Here are some ideas you could do with your children with this:

Get a whole party of friends together (outside preferably, to save your ears) and they can either all bring their Top shakers, other junk instruments or miscellaneous instruments and then get them to make a piece together
You might want to share some ideas to structure it to start them off to avoid them just making a racket such as a) each play a pattern or solo one at a time round the circle b) all learn certain patterns or rhythms (you could even use words for these such as 'Top___ sha-ker, Top___ sha-ker" or "Shake the, shake the sha-ker"   c) play the order backwards. d) start with one person and then all join in, one at a time when the conductor shows them, e) have everyone playing, then one person does a solo, then everyone, then someone else does a solo.
Then, you could use an app on your phone or on the computer so they can record it- they could then use Windows Movie Maker to put pictures with their recording for their 'hit'!

For more ideas for BRILLIANT junk instrument ideas, go to www.nyphilkids.org

I was really pleased with this so I wanted to share it with lots of other people!


Sharing with Creative Monday with Claire Justine


Monday Parenting pin with Romanian Mum blog  and hosted by Diary of a Frugal mum this week as I think this would be a cool holiday craft for kids!
The Diary of a Frugal Family


With Cynthia at the In and Out link party at Feeding Big

In and out of the kitchen link party


You're gonna love it Tuesday with Kathe with an e


Tuesday, April 22, 2014

FLOWER PUNCH #1 Card-making is easy!

I get lots of people saying that they wish they could make cards.  I am no artisan, my cards LOOK like an amateur has made them but I simply enjoy what I do and like to hope that the recipient is touched by the effort.  I take inspiration from magazines and pictures, but sometimes it's a case of just sitting there with some ingredients/material and tools and exploring.   It doesn't have to be expensive but you do need some tools, but so much can be done with very few. If you want to give it a go but don't want to spend loads, I recommend one product- an flower-shaped punch (this baby cuts into paper, card-stock and funky-foam)- cost about £6 at the time.

Take ONE x-cut flower punch. I bought one around 10 years ago and it has more than paid for itself in use.  You can make lots of replicas of the same card to build a stash but more often, I like doing variations.

The other components were literally:

SCRAP: 5 old birthday card envelopes I received in various shades of purple and pink, an old Pukka pad front cover, old buttons (I got mine in a Charity shop- got about 200 for £2!!!)
TOOLS: some coloured paper (again, can be remnants or scraps), scissors, PVA glue, Pritt-stick, Sticky-pads (Can be got from Poundland but glue will suffice), gel pens (can be any coloured implement).
Vase flowers
Card no.1 began from the envelope colours.  I looked in my stash box and found a piece of stripy card which was the front cover of a redundant Pukka pad I chucked out which I trimmed to just smaller than the card size.I also found a piece of blue card which I am pretty sure was once a tissue-box.    I then drew a vase template on the back and cut it out with smallish scissors.

The flowers were easy to craft- I punched 4 flowers in each of my scrap-envelope colours and laid them next to each other on a scrap piece of funky foam.
To make them 3d, you need another useful tool- an large Embossing tool (this is rather like a large tipped ball-point pen- you can see some here).  To make the petals curl, you rub them in circles with the embossing tool and the edges curl up prettily.  I then laid them on top of each other to make each flower.  Each was glued in place with a small spot of Prittstick (don't glue the petals, just the centre) and I stuck on cute little buttons (charity shop- I got about 200 for about £3!)

How I go about making the next one, particularly if the scraps are one-off (like the stripy card), I then look at the tools and what I've got and what I can make.

Flower field
Notably, in this case, I saw these very very thin strips of yellow scrap card falling out of my messy-can't-be-bothered-to-put-it-back-in-the-shed craft basket (these were left from some lettering I'd made for my display board at school and I thought they were too sunny to check and decided to make buttercups (ish)

flower 1
Having made about 20, (some you will notice, didn't quite make the perfect shape) I then cut some green paper into grass shape, drew gel-stems and stuck on.  Reminiscent of Sophie's blog post.

There were still a few left and so I had the idea to make them into a heart shape.  I made the mistake of trying to fringe the edge of the green paper to make a flat-meadow- yep, it looks rubbish- but ah well.  You can see some of the '2nds' are not quite complete flowers.  This time, a nice orange gel pen gave these centres and I drew some fake orange sticking around the edge to fill the white space.


So, really, you can see, these are really easy to make and simple.  Ok, so you might not sell them in a shop, but I am sure someone will appreciate the effort of you making them.

So, two key tools to start your card-making with are
Flower punch (x-cut are great)
Embossing tool (mine was Fiskars and came free with a magazine Subscription.

Let me know if you give any of these ideas a go, I'd love to see.

Linking to:
 Claire Justine's Creative Mondays,


You're gonna love it with Kathe with an e

In and out link party with Cynthia at Feeding Big
In and Out of the Kitchen Link Party
Feeding Big