Take ONE x-cut flower punch. I bought one around 10 years ago and it has more than paid for itself in use. You can make lots of replicas of the same card to build a stash but more often, I like doing variations.
The other components were literally:
SCRAP: 5 old birthday card envelopes I received in various shades of purple and pink, an old Pukka pad front cover, old buttons (I got mine in a Charity shop- got about 200 for £2!!!)
TOOLS: some coloured paper (again, can be remnants or scraps), scissors, PVA glue, Pritt-stick, Sticky-pads (Can be got from Poundland but glue will suffice), gel pens (can be any coloured implement).

Card no.1 began from the envelope colours. I looked in my stash box and found a piece of stripy card which was the front cover of a redundant Pukka pad I chucked out which I trimmed to just smaller than the card size.I also found a piece of blue card which I am pretty sure was once a tissue-box. I then drew a vase template on the back and cut it out with smallish scissors.
The flowers were easy to craft- I punched 4 flowers in each of my scrap-envelope colours and laid them next to each other on a scrap piece of funky foam.
To make them 3d, you need another useful tool- an large Embossing tool (this is rather like a large tipped ball-point pen- you can see some here). To make the petals curl, you rub them in circles with the embossing tool and the edges curl up prettily. I then laid them on top of each other to make each flower. Each was glued in place with a small spot of Prittstick (don't glue the petals, just the centre) and I stuck on cute little buttons (charity shop- I got about 200 for about £3!)
How I go about making the next one, particularly if the scraps are one-off (like the stripy card), I then look at the tools and what I've got and what I can make.
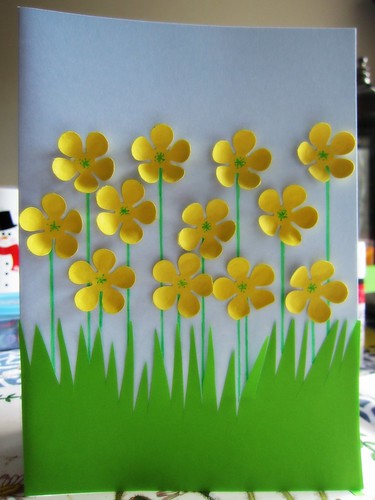
Notably, in this case, I saw these very very thin strips of yellow scrap card falling out of my messy-can't-be-bothered-to-put-it-back-in-the-shed craft basket (these were left from some lettering I'd made for my display board at school and I thought they were too sunny to check and decided to make buttercups (ish)

Having made about 20, (some you will notice, didn't quite make the perfect shape) I then cut some green paper into grass shape, drew gel-stems and stuck on. Reminiscent of Sophie's blog post.
There were still a few left and so I had the idea to make them into a heart shape. I made the mistake of trying to fringe the edge of the green paper to make a flat-meadow- yep, it looks rubbish- but ah well. You can see some of the '2nds' are not quite complete flowers. This time, a nice orange gel pen gave these centres and I drew some fake orange sticking around the edge to fill the white space.
So, really, you can see, these are really easy to make and simple. Ok, so you might not sell them in a shop, but I am sure someone will appreciate the effort of you making them.
So, two key tools to start your card-making with are
Flower punch (x-cut are great)
Embossing tool (mine was Fiskars and came free with a magazine Subscription.
Let me know if you give any of these ideas a go, I'd love to see.
Linking to:
Claire Justine's Creative Mondays,

You're gonna love it with Kathe with an e

In and out link party with Cynthia at Feeding Big

