Showing posts with label cards crafting. Show all posts

Wednesday, April 05, 2017

A versatile card idea

Hello there!

It's been a while since I shared a craft post, mainly because I have been busy doing other activities and have not made anything.  I actually have been crafting up a storm in the past 2 days, having made about 10 cards which I will share in due course (as some of the recipients read this blog) so I thought I'd share my Mother's day card which Mum has now received so I can share it!

I have repeated this many times but if I could advise you of one versatile craft tool to buy, I would say, buy a flower punch.  I have a few in various flower and size options but any will do.  

My flower punches have been utilised on so many occasions in different combinations.

Here, I used 2 punches- one is a basic flower punch and the other is a tiny daisy border punch.


 The benefit of this card design that I came up with for Mum is that anything could go in the centre of the heart: Mum, Dad, A lovely couple, Gran, Sister, Thank you, On your Christening, On your confirmation, Love, Valentines, Bob...
 To make this heart-shaped design, you will need:

  • Tiny flower punch (mine came from The Range.)
  • White card base.
  • Metallic card in turquoise or colour of your choice (mine was from a Stationery shop I've forgotten the name of.
  • Tiny self adhesive gems (mine came from Poundland for a pack of 504)
  • Flower edge punch (Fiskars do some good ones)
  • Black fineliner
  • Silver gel pen.
  • Prittstick.


  • First, fold and cut your card to size.


  • Secondly, use your border punch along the long outside edge to make a border.
  • Next,   punch a set of turquoise flowers and then arranged them on the table until you have a shape you like.  
  • After, glue them using prittstick onto your card front, making sure you evenly space the heart from all four edges. (you can use PVA, I just prefer to avoid if I can)
  • Following that, select and carefully snip the gems for the flower centres (I chose to alternate lilac and silver) from the plastic sheet and position onto the centre of each flower (watch out, sometimes, some of them don't stick properly. I had to reposition one of two with Prittstick- PVA would be better for this...)
  • Then, fill in the gaps between the flowers with green gems.
  • Lastly, find a font style you like on the internet and  copy it, drawing it lightly in pencil onto the centre of the heart (I practised on a piece of scrap paper first).
  • Go over the pencil in black pen and then edge it in silver.
  • Finito!


As I said, this design can be utilised for many occasions and you really don't have to be skilled to do this.  You don't even need the border punch if you really want. 
I will show another design in a week or so I did which used the same elements for this but in a different way for a different occasion.

Have I inspired you?  Would you give this a go?
Do share if you do!

xx

Sunday, September 20, 2015

Take ONE tool...

You know me- I like my workhorse tools in my craft making endeavours.  
My Woodware extra large daisy punch and its medium  and small equivalents are such hard-working items. You can see them/buy them here.

As is often the way when I make cards, I make one card and then, since I've got the tools out, I often feel inspired to make a card with the same method but a different design. I do have many cards in my card collection but it's nice to have a choice. 

One great thing about designs that use paper punches is that you can make a card out of relatively little, so if you are on a budget or want your children to have a low-cost activity, you can use any scraps of paper.

My top sources of punching material are:
tissue boxes, junk mail, used envelopes, thick wrapping paper, magazines with a print background.

Anyway, I digress.  Onto the cards.

To make any of the daisies I've made you must:
  • Punch 3 identical sized daisies in the same colour.
  • Fetch a ruler and an embossing tool and a piece of funkyfoam.
  • roughly 'draw' lines with your embossing tool along the petals of each flower- this will make them appear more ridged and they will also curl in rendering a more 3D effect.
  • Layer them on top of each other so there are no gaps between petals.
  • Punch a circle to go in the middle.

I have a lot of aperture (cards with a pre-cut hole) cards in my collection which I find very hard to use (in fact, there are some I'm quite sure I'll never fathom using! Why did I buy them!?) but I discovered that the daisy fitted in this circle apeture. I drew some gold spots onto yellow paper, plus added a line to the top and bottom and added some Marie Curie daffodil stickers to the line. To be honest, I'm not particularly pleased with this but it will do.

All these are made out of some paper scraps from packaging or paperwork and I used the medium paper punch.  Simple but this is my favourite.
Similar to the last one, if you think you've seen that scalloped gingham before, that would be because it comes from the same container as the ice-cream card from a few weeks ago! This one feels a little sparse but I like simplicity.
This one is probably my favourite of the lot- it's the colours! The background is a panel from a tissue box (free!!!!) and it didn't take much to make this but it works (I hope).

They're all different but unified by the same method of constructing the daisy!

Have you made any cards recently? DO share if so!

xx
Sarah-Jane made her first foray into card-making, these are super and The  Dormouse at View from the teapot, shared some  beautiful cards she made (she makes unbelievably beautiful Zentangles too, of which I am a proud owner!)

Linking with Claire Justine at Creative Mondays!

xx

Tuesday, January 21, 2014

Super-easy Valentines card craft idea

 In case you haven’t noticed, since I am sure all the shops will be peddling their Valentines tat, sorry, confectionery and romantic goods, Valentines day will soon be upon us!
Thus, I thought I’d give you a super easy idea for card you might want to make your loved one.  You have had a preview in my last photo scavenger hunt.
Like me, I am quite sure you have a stash of buttons- regardless of my large crafting hoard, I have a huge collection of those spare buttons that you get with clothes (which I never seem to sew on (how sad that is).  If you’re not so hoardsome, then you can easily buy some from a craft store.market haberdashery.
All you need is a white card (or colour of your choice).
Sort the colour scheme you want, you could choose...
All blues:
 blue buttons card
All pastels:
 Pastel buttons card

A balanced rainbow:
rainbow buttons card
Lay out your buttons in the middle of the card into a heart shape.  You can make a solid heart OR create the outline.  You might have to fiddle a bit, especially if they are different sizes and to get the shape.  To ensure once I found the shape that I liked, that I didn’t lose it in the process of sticking them down, I took pictures of the card.    Stick them down with PVA glue- I apply it with the end of a cotton ear bud that I have removed the cotton from.  I picked up one at a time to try and keep the shape and replaced carefully.  (by the way, I dip my finger into water and pick the button up with the tip of my finger which then means I don’t knock the others out of place.  Or lick your finger. Whichever.)
You can just leave it there but I chose to fix use a message sticker below the heart.  Actually, I think I ruined the outline heart by adding that sticker- would have been nicer in the silver ones or just blank!
And voila, you have a finished card!
If you are a Valentines cynic, then this can always double up as a wedding card, engagement card, new baby card, Christening card or even just a girly birthday card!  Whatever floats your card-giving boat.
Oh and since the buttons were out, I decided to give the black ones an outing too (because they’re harder to use apart from for poppy earrings or musical note heads!) and made a card for my chess playing sister-in-law’s birthday card (really hope you don’t read this Monkey girl!)

Buttons chess card

FYI, none of these are CBC’s card as I’ve given him Valentines buttons before!!

Linking up to some of the lovely craft ladies' blogs which I have been terrible at joining with recently with actual crafts!

Claire Justine at Creative Mondays 


Tuesday, March 26, 2013

Tray bake

You wish.
I wish indeed!

Tray bake

This may be my most spectacularly rubbish upcycle or make EVAH!  But I shall still share it in case it inspires you to show me how to do it better or you think of some scabby unloved tea-tray too!
Old boring, scabby wooden tray in the kitchen has sat unloved and unused for ages.  Was going to visit a charity shop near you but I decided to have a little mess around before I did anything so drastic!

I dug out a daisy shaped paper punch, some acrylic paints and a big stubby paint-brush (and some scrap card) and cut myself a template which I then used to make a line of daisies. It looked bare and boring so I found one of my most disliked/avoided craft devices, the rubber stamp, (despite this fact, I seem to have loads of them, mostly gifts, bumper pack items or bargain bin finds) and proceeded to make it look even worse by adding rows of fern on either side using more acrylics!  Next time, I'll do decoupage instead!

You're wondering about the cake, right?  Surely we all appreciate a gratuitous cake shot (a Cadbury's chocolate cream gateau that was tragically found on the Reduced to Quick Sale counter at Tescos. I had to rescue it in order to help it achieve its destiny of lining one greedy person's many persons' stomachs. It is delicious, incidently.  I still have half to go!

Left over acrylics

I always end up left up with a bit of acrylic paint left which it seems a shame to chuck as it is expensive so I made a sort of swirly pattern on the back of a cracker box.  I then cut them up to make these two Easter cards (also using some scraps of card hanging around) and some Anita's daffodil stickers to give a lovely Spring look!
Somehow, sitting there watching Ella Enchanted as I did this, I ended up using the corrugated coffee card leftovers to make hearts and made this other masculine Love card!  I suppose it could be a Valentines!

I just got back from attending a Lindy class in London.  Usually, I feel really psyched after these but I really had trouble with the moves tonight- it involved a quick spin using single step footwork (as opposed to a triple step) and I just kept landing awkardly/badly and an immediate contrasting turn in the opposite direction which threw me off each time.  I felt like my partners thought 'what on earth is she doing?'  Plus I sat and watched the Intermediate class after (whilst waiting for CBC) and discovered I could have joined in if I had really wanted to, which is a shame as they learnt a realllllllly cool move called 'Around the World' (like the Yo-yo!).  I paid the extra to do some social dance after but CBC had a horrid day and wasn't in the mood for dancing but at least we went to Wagamamas and I ate far more ramen than is healthy for one person to do!

Hope you are well!x

The link party:

Lakota's Ta Dah Tuesday featuring one fab Angry Birds cake!

clairejustineoxox
Claire Justine's Creative Mondays

Feeding Big


Cynthia's In and out of the kitchen linkie.
and the Daring Card Makers Spring challenge for this week!

Be sure to go and visit!


Tuesday, February 26, 2013

"You're nothing but a pack of cards!"


Hello there!  How are you?  Well, I hope!  Hello to my lovely new followers!  You are helping me towards my little, sort of wish/nice idea of having 100 followers for my 7-year blog anniversary in April! I've never been one for deliberately garnering followers (you can tell that from the 91 followers in 7 years thing) but it's always such a secret delight when I find someone is kind enough to follow me!  I am delighted that each of you found something you decided to come back to!!!  Thank you!!!

Last year, I took part in Annie the Felt fairy's A make a month and that kept me on track making something every month!  Somehow, the impetus has gone since the lovely Annie has not reissued the challenge, for personal reasons.

Anyway, I always enjoy making cards in the holidays but sometimes wish I were more focused in trying other crafts. I did try glass and ceramic painting last year, making boxes, brooches, jewellery, which was great but I wish I could actually be disciplined enough to try and learn a new craft such as crochet, knitting, dress-making, mosaic-making!  Sigh!  At some point I hope! Maybe the wedding (August!) can be the impetus for me to try something new!!!!

Anyway, I did make some cards.  All of them involve something recycled as usual!

Cards 1

1.  The top left one is for my friend's wedding next month.  The William Morris paper is something a work colleague dumped in the recycling (print-out) and I punched the flowers out of an old school letter.
I used an embossing tool to curl the petals of the flowers.
2.  J's birthday card- I've got sooooooooooo much ribbon that I never use!
3.  I punched the butterflies from some scrap for this one.  I liked using aperture cards
(I got a job lot from The Works for 29p for 8 cards!)
metallics
4.  The Star card reuses one of those free CDs they used to send in the post.  The star was a Christmas  tag from a child.  I used the embossing tool to add the line details.
5.  The gold patterned squares were punched from some old Christmas crackers.  It's a standing joke at our church Christmas meals out, that I collect up all the cracker ends to turn into my Christmas cards!  One friend even collected me cracker ends at a party she went to! More paper flowers from scrap and a gold gel pen
6.  This mosaic-style one recycled another cracker- I liked the fact it looks like these are all part of a picture.
Flowers
7.  The NASUWT fee does provide something- the front cover of their magazine was a pretty swirly rainbowy pattern that was begging to be made into something pretty!  The blue background of both cards was a tissue box.
8.  A different tissue box.  Is it sad that I chose those particular tissues for their potential recycling qualities!
9.  See number 7.
Clouds
10.  One of my favourite crafts is quilling!  I used some blue scrap paper to make the rain drops for CBC.  It was a pop-up card, can you guess what the sentiment is????
11. "            "
12.  I accidently forgot to give out flyers for a previous concert from my orchestra.  It seemed a waste so I turned them into envelopes!  Two of my blogging penpals may recognise them!

What have you been making recently?  Something lovely, I hope!
xx

Linking up to Lakota's Ta Dah Tuesday!!!

And also linking up to
Claire-Justine's creative Monday for the first time!
And Sarah's Super handmade Sunday


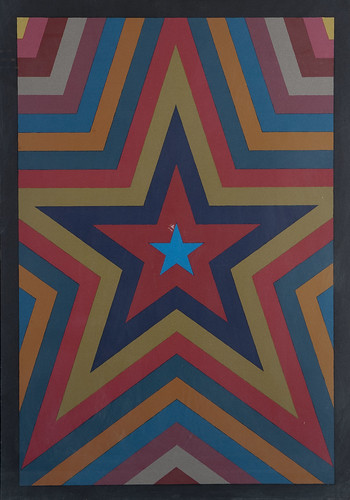
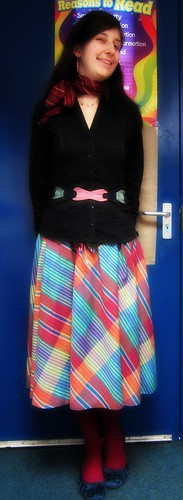
Oooh, and I forgot, it was Style Imitating Art with Jess of Animated Cardigan this week- the inspiration was this awesome Sol Lewitt's untitled lithograph (WHAT is a lithograph? Must find out!)


Here's what I wore for the interpretation!


Yes, it is the madras check dress again! And a vintage belt of my Mum's that I 'borrowed' years ago!!!  Try to ignore the heinous combination of magenta tights and turquoise satin ballet pumps!!! And the attempt at a side-parting! Go and check the link above to see how else the other participants styled it!

The projector
Oh, and if you are still with me.  Well the projector update that several of you asked about?
It was a new projector.  I turned it on for Singing assembly this morning and..
1.  The display was upside down
2.  It was out of line to the left in direct relation to where I hit it.
3.  It was blurry!!

Everyone gleefully told the IT technicians about how I had accidently hit it!!!
My kids found the above problems hilarious but luckily my lovely year 6 screen operator boys managed to rotate all the lyrics in the powerpoint upside down so we could read it and then shifted them to the right.  I love it when kids manage to troubleshoot!!!